I want to make a blue dress from a top sheet I got at Sheriden. The blue is similar to a dress I made in the past. I was tempted to remake that dress. While I was bored, I got stuck with the idea of experimenting with pintucks. I did a sample at school. Its time I move on and do a garment. Of course, while I was bored, I looked pintucks on how to do it and garments featuring pintucks. While Experimenting with the patten I’ll make a shirt first.
13/5/2025
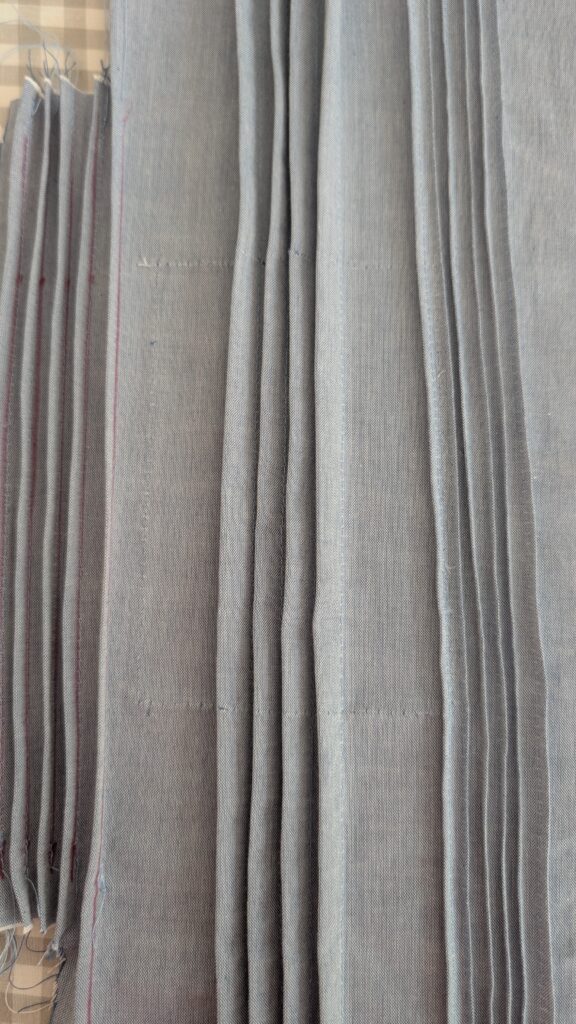
Yesterday I got the bag the sheet set came in and used it too test out pintucks. Right now, my sample survived the washing machine and is hanging on the washing line. First, I got a ruler out and draw five lines on the fabric 1 cm about. Then draw ten more lines a little spaced apart. The first batch a sewn I used three lines to form a pintuck. I used a line to fold along and a different line to sew along. This pintucks a similar to pleats. A lot bigger and deeper. These ones I could fold to the side. These would look nice along the button stand. Next using the five lines I folded along the lines and sew just next to the fold line. This one is hard to do correctly. If I do this, I need to find a way to sew accurately in a perfect straight line. This first batch of pleats left me wondering what if I did it differently. To draw the lines, I first used a friction pen because I can make the lines disappear with the iron. This is not ideal for when I make pintucks because I need to iron more often than I did.
My chalk is too thick and didn’t leave nice lines. This is why I rarely use chalk. I used a texter. This is machine washable and will survive the iron. The line is thick and makes things ugly while sewing. I draw ten lines and tried smaller pintucks. This time I folded so the to lines meet and sew along the lines. It wasn’t as nice as the other pintucks I did. Experimenting is all part of creating. The big pintucks will look great along the line a button stand. This tiny pintucks will look good in a main area. Like a yoke.
21/5/2025
I been thinking and thinking on how am I going to do the pattern for pintuck. Eventually I realise I will need to make a sample. Then unpick it and trace it onto paper. This will also help me test the angle of the diamond.
Yesterday I cut a chunk of a hotel sheet and ironed it flat. We bought some sheets years ago to use as test fabric for this. Using my mannequin, I tested how long I wanted to make the diamond. Since it will be a dress, I can make the diamond longer than a shirt. I was going to make each pintuck five millimetres apart. The pintucks would have been to close together and hard to do. Centimetre is what I went with. The next pintuck on each side is lower. First three I went with five millimetres lower. It didn’t look right. So, I unpick them to be a centimetre lower on each side. Eventually I settled into a groove. With love songs playing in the background, I was sewing ironing measuring and repeat. Place a dot a centimetre down and a centimetre across. Placing a dots a centimetre away from the stitching of the previous pintuck. Then I folded the fabric along those dots and ironed it flat. Took it to the machine to sew it down. Iron the other side and stitch that down. I didn’t want to make the pintucks too deep. I have the edge going along the inside of the feed dog. This is working well for me. Yesterday I spent over two hours sewing this. I also got more experience using my industrial sewing machine and getting better at controlling it. Practice makes perfect. I got Eurovision playing in the background. Time to get back to sewing and finish this diamond.
Annnnnd it’s done. Forty one pintucks to achieve my diamond. It almost reaches the sides of my mannequin. On my own body I may want it wider or more narrow. It looks good on my mannequin. Not sure how it will go when I add a neckline and collar. I will need to work this out. I am tired after a busy day so this can be for tomorrow.
29/5/2025
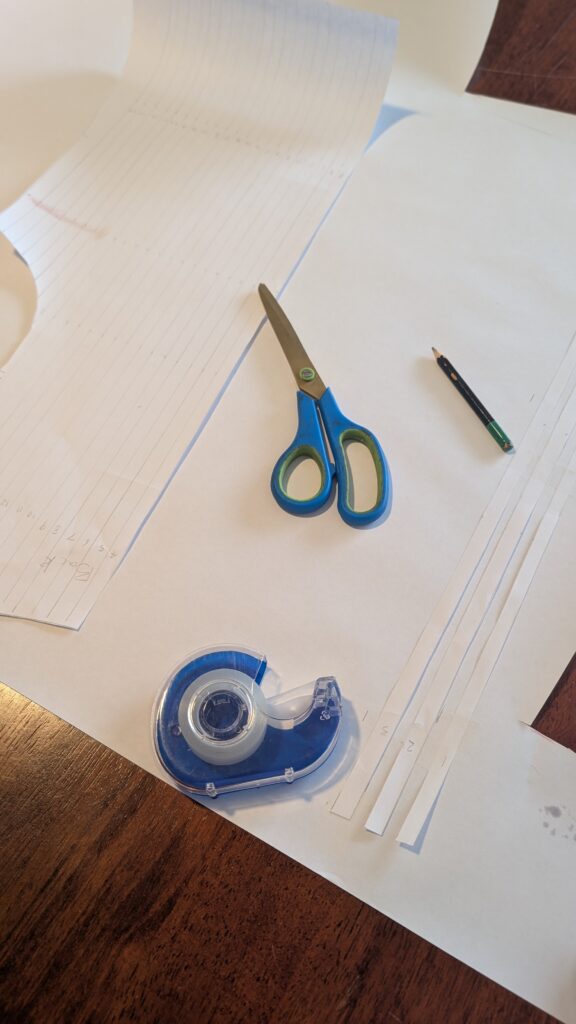
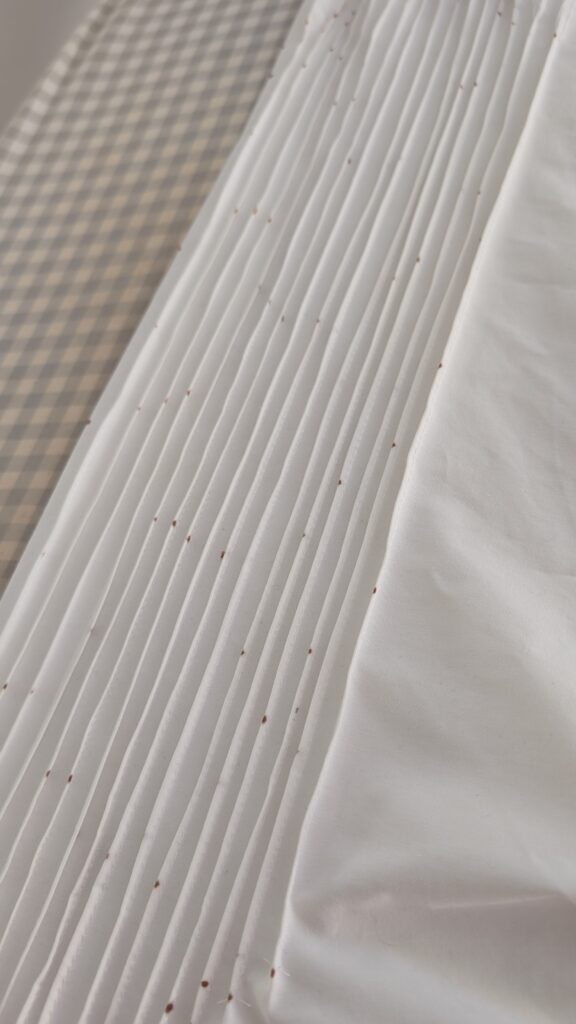
At looking and fiddling with my pintucking I couldn’t find the answer. So, I went down the path of pattern making. I unpicked five of my pintucks to get the measurement of the width. Five millimetres. I traced around my back block ignoring the darts. The width of my diamond patch is thirty one centimetres. I will ignore this too. Each pintuck is one centimetre apart. Putting the ruler across the waist of my block twenty four centimetres look good. I placed dots a centimetre apart in three places along my pattern and draw lines for my pintucks I numbered each space so I can easily work out the lay out. I cut put the first pattern to cut in to stripes. I used the set square to draw a massive L on the paper, this way when I tape down my pattern again it will be straight. Started from the centre I cut a stripe and tape it down measured five millimetres away to tape down the next stripe. This took hours. This is why I didn’t want to do it in the first place. Also, I’m using a lot of paper. I had no choice. All that’s left to do is mark out the pin tuck diamond. I am still unsure how my neckline and armholes will work out. Just going to have to sew it and find out.
30/5/2025
With the centre back I had two millimetres to the centre back for the centre pintuck. After that I got distracted and started adding the one centimetre seam allowance. For each pintuck gap I draw a straight line. Then connected all this line to match the curve. Since the pintuck is not going all the way to the end I don’t know how this will go. Let wait and see what happens. The centre pintuck is under fifty four centimetres. Drawing the end lines for the pin tuck was so much easier this time compared to when I first created the diamond. Using the centimetre grid on my metric French curve made it so much easier. From the centre back pintuck I draw across to make the end of my pintuck. After that I went to the next gap. One centimetre down one centimetre across. With the grid on ruler, I just had to a line it up. So so much easier. I’m a little nervous about armhole area. The pin tucks are a bit close to the underarms. We will see what happens. I’ll make a shirt first to test the pattern before moving on to the dress. Also, I will to a simple collar for this because I’m working on pintuck right now.
2/6/2025
I wasn’t able to do what I need to do today. So, pattern making it is. With Kyle Alessandro from Eurovision playing in the background. I worked on the front of the shirt. I traced my block out. This won’t need too much tweaking. I’ll be adding the pintucks next to the button stand. I measure a bit of the pack to transfer some of those pintucks over. I wanted five. I got the measurement of nine centimetres. Half of that is four and a half. From the centre front I had four and half from there. Then measure centimetre then five millimetres. To get my perfect pintucks. Then draw lines to mark all six pintucks. Yes, I got an extra. Oops.
Next, I moved on to buttons. Since this is just a toil I’ll use buttons from my button stash. It will be a wearable toil, so I still want it to look good. I picked white because it will work with the blue and I have plenty of those. I picked nine that look closest to each other. The biggest is eleven millimetres. From there I worked out the button stand will be two centimetres wide with one centimetre fold over seam allowance. The I added five millimetres seam allowance and fiftteen millimetre hem.
The sleeve was easy compared to the other pieces. First, I draw the pintucks. This will cover six centimetres of my sleeve. Then trace around my sleeve excluding the six centimetres from the centre. I made it a short sleeve, twenty centimetres in length. I add five millimetres seam allowance then fifteen centimetres hem.

3/6/2025
I started by cutting out the patten while listening to a podcast about the mushroom cook. I made sure to cut out the pintuck area on the back out properly. I laid out the blue fabric. Then I noticed the straight of grain goes across the sheet. Not the length. Well, it’s a bed sheet not dress fabric that is allowed. It took my forever to re lay out the fabric. The sheet isn’t perfectly square. Also, I had to unpick the top and bottom seams. I decided to use the preexisting side seams as my hems. Yes, the lazy option. I gave up on getting it perfectly laid out and focuses on the little bit I will use. I understand why people get paid a lot of money to lay out and get out the pieces. This takes a lot of skill. I got my cutting mat out and my rotary cutter. After cutting the straight seams on the back I realised, I will need the fabric scissors for the zigzag of the pintuck. I really want to cut these perfectly so I can do the pintucks perfectly. The front and sleeves were easily done with the rotary cutter. I still have plenty of fabric leftover to make a dress.
No excuses. I need to baste those curves. First, I Replaces the white thread in my machine with blue thread. Then I did a test swatch to make sure the tension is perfect. Since I am only stay stitching my curves, I changes the stitch length from four to the longest the machine can give me. I did make a mistake and not press a button before doing this. I will need to remember for next time.
4/6/2025
A brand-new day and I finally have time to sew. I started with stay stitching the sleeve heads. Then I moved on to the front of the shirt. There I did collar and armholes. With the back of the shirt I started with the armhole because I got confused. Then I decided just to the hole top edge. Shoulder and collar. I finished my day doing the pintucks on the sleeves. Since the hem is already done the pintucks stand out more. Can’t wait to see it on the shirt.
5/6/2025
Prep work is very important. Before I can get to the pin tucks on the front, I need to get everything else done. I’m starting with the darts to give it shape. Then iron and press them in. Next is the button Stand. I just remember to add interfacing to the button stands. So, I cut some out. Using light interfacing. I will need to add more for buttonholes later. The final step for the front is the pintucks. I accidently marked the wrong side. Lucky, I caught that before I started to sew. The pintuck take work. It is worth it and looks so good. The Front is done. Tomorrow I can work on the back.
6/6/2025
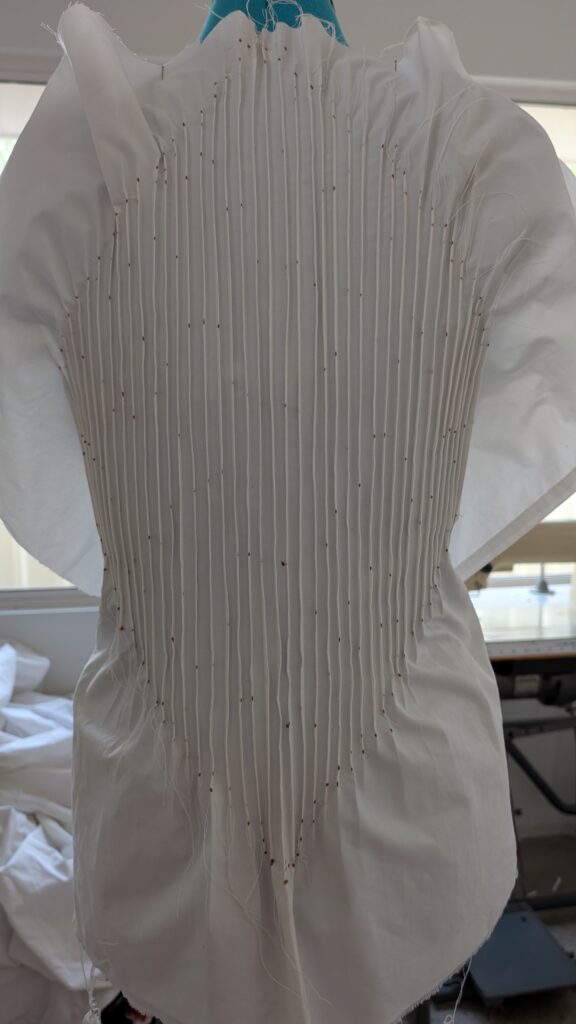
Today is a brand new day. Let see what I can do today before work. While listening to a podcast about the news. First, I punched holes in my pattern so I can mark where the pintucks are and how long they will be. I used my awl to do this. I accidentally started doing that along the seam allowance before realising my mistake. I carried on punching holes at the end of my real pintucks. I lined up my pattern and started to mark the fabric where the holes are using a red texter. Hopefully it will wash out. ten rows of pintuck in and I run out of bobbin thread. At least I won at bobbin chicken. I will wind two bobbins, so I don’t need to worry about this. With That all done I can go back to doing pintucks.
Twenty five pintucks are done. I am half way though the back. It is amazing how much it shrunk. Sadly, I am done for today and I have to go to work.
Leave a Reply